## How to Build a Patio Cover Step by Step: A Comprehensive Guide
Ready to transform your outdoor space into a comfortable and stylish haven? Building a patio cover is a fantastic DIY project that can significantly enhance your home’s value and your enjoyment of the outdoors. This comprehensive guide will walk you through **how to build a patio cover step by step**, providing detailed instructions, expert tips, and considerations to ensure a successful and long-lasting result. Unlike many basic tutorials, we delve into advanced techniques and crucial planning stages, drawing upon years of practical experience in construction and design. Whether you’re a seasoned DIYer or a beginner, this article will empower you with the knowledge and confidence to create the perfect patio cover for your needs.
### Why Build a Patio Cover?
A patio cover offers numerous benefits, including protection from the sun, rain, and other elements. It creates a comfortable outdoor living space that can be used year-round. A well-designed patio cover can also add aesthetic appeal and increase your home’s property value. Recent studies have shown that homes with well-maintained outdoor living spaces are more appealing to potential buyers.
## 1. Planning and Preparation: The Foundation for Success
Before you even think about picking up a hammer, careful planning is essential. This stage will determine the success and longevity of your patio cover. According to leading experts in patio cover construction, a thorough plan is half the battle won.
### 1.1. Understanding Building Codes and Permits
* **Local Regulations:** Research local building codes and regulations regarding patio covers. This includes zoning laws, setback requirements, and any necessary permits. Ignoring these regulations can lead to costly fines or even the need to dismantle your structure. Contact your local building department for specific information.
* **Permit Process:** Understand the permit application process. This typically involves submitting detailed plans and specifications to your local building department. Allow ample time for permit approval, as it can sometimes take several weeks or even months.
### 1.2. Defining Your Needs and Goals
* **Purpose:** Determine how you plan to use your patio cover. Will it be primarily for dining, lounging, or entertaining? This will influence the size, shape, and features of your cover.
* **Budget:** Establish a realistic budget for the project. This will help you make informed decisions about materials and design. Be sure to factor in the cost of materials, tools, permits, and any professional help you may need.
* **Aesthetic:** Consider the overall style of your home and choose a patio cover design that complements it. There are many different styles to choose from, including open-beam, solid-roof, and retractable awnings. Consider the architectural style of your home and the surrounding landscape.
### 1.3. Choosing the Right Design and Materials
* **Design Options:** Explore different patio cover designs, such as attached, freestanding, gable, and flat roofs. Each design has its own advantages and disadvantages in terms of cost, aesthetics, and structural integrity.
* **Material Selection:** Select durable and weather-resistant materials, such as wood, aluminum, or vinyl. Consider the climate in your area and choose materials that can withstand the elements. Wood offers a classic, natural look but requires regular maintenance. Aluminum and vinyl are low-maintenance options but may not be as aesthetically pleasing to some.
* **Size and Dimensions:** Accurately measure the area where you plan to build your patio cover. Consider the desired height, width, and depth of the structure. Ensure that the dimensions comply with local building codes.
### 1.4. Creating Detailed Plans and Drawings
* **Blueprint:** Develop detailed plans and drawings that include dimensions, materials, and construction details. This will serve as a roadmap for the entire project. Consider hiring a professional architect or designer to create the plans if you are not comfortable doing so yourself.
* **Material List:** Create a comprehensive material list based on your plans. This will help you stay organized and avoid unnecessary trips to the hardware store. Factor in waste and overage when calculating material quantities.
## 2. Gathering Tools and Materials: Setting Up Your Workspace
Having the right tools and materials on hand will make the construction process much smoother and more efficient. Before you begin, make sure you have everything you need.
### 2.1. Essential Tools
* **Safety Gear:** Safety glasses, gloves, and a dust mask are essential for protecting yourself during construction.
* **Measuring Tools:** A measuring tape, level, and square are necessary for accurate measurements and alignment.
* **Cutting Tools:** A circular saw, miter saw, and handsaw will be needed for cutting lumber and other materials.
* **Drilling Tools:** A power drill and impact driver are essential for fastening materials together.
* **Fastening Tools:** Screws, nails, and bolts are needed for securing the structure.
* **Ladders:** A sturdy ladder is necessary for reaching elevated areas.
### 2.2. Material Procurement
* **Lumber:** Purchase high-quality lumber that is appropriate for outdoor use. Pressure-treated lumber is recommended for ground contact.
* **Roofing Materials:** Choose roofing materials that are durable and weather-resistant, such as asphalt shingles, metal roofing, or polycarbonate panels.
* **Fasteners:** Use corrosion-resistant fasteners that are designed for outdoor use.
* **Concrete:** If you are building footings, you will need concrete mix and forms.
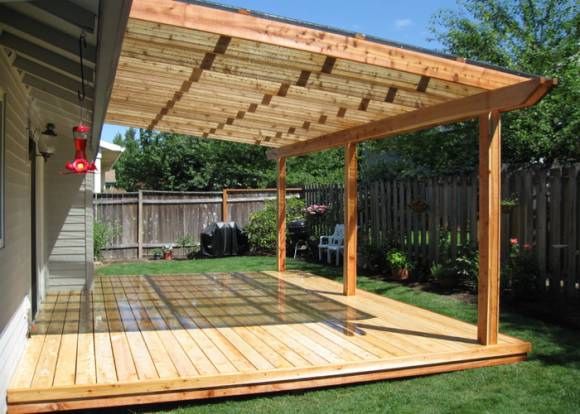
## 3. Building the Foundation and Support Structure: The Backbone of Your Patio Cover
The foundation and support structure are crucial for the stability and longevity of your patio cover. This step involves building footings, posts, and beams to support the roof.
### 3.1. Constructing Footings
* **Digging Holes:** Dig holes for the footings according to your plans. The depth and diameter of the holes will depend on local building codes and soil conditions.
* **Pouring Concrete:** Pour concrete into the holes and insert post anchors. Ensure that the anchors are level and properly aligned.
* **Curing Concrete:** Allow the concrete to cure for at least 24 hours before proceeding to the next step.
### 3.2. Installing Posts
* **Cutting Posts:** Cut the posts to the appropriate length according to your plans.
* **Attaching Posts:** Attach the posts to the post anchors using bolts or screws. Ensure that the posts are plumb and square.
### 3.3. Erecting Beams
* **Cutting Beams:** Cut the beams to the appropriate length according to your plans.
* **Attaching Beams:** Attach the beams to the posts using bolts or screws. Ensure that the beams are level and properly aligned.
## 4. Constructing the Roof Frame: Creating the Skeleton
The roof frame provides the structural support for the roofing materials. This step involves installing rafters, purlins, and other framing members.
### 4.1. Installing Rafters
* **Cutting Rafters:** Cut the rafters to the appropriate length and angle according to your plans.
* **Attaching Rafters:** Attach the rafters to the beams using nails or screws. Ensure that the rafters are evenly spaced and properly aligned.
### 4.2. Adding Purlins or Sheathing
* **Cutting Purlins/Sheathing:** Cut the purlins or sheathing to the appropriate length according to your plans.
* **Attaching Purlins/Sheathing:** Attach the purlins or sheathing to the rafters using nails or screws. This provides a solid surface for the roofing materials.
## 5. Installing Roofing Materials: Protecting Your Patio
The roofing materials provide protection from the elements and enhance the aesthetic appeal of your patio cover. This step involves installing shingles, metal roofing, or other roofing materials.
### 5.1. Preparing the Roof Surface
* **Cleaning:** Clean the roof surface to remove any debris or dirt.
* **Underlayment:** Install underlayment to provide an extra layer of protection from the elements.
### 5.2. Attaching Roofing Materials
* **Shingles:** Overlap the shingles according to the manufacturer’s instructions and fasten them with nails or staples.
* **Metal Roofing:** Overlap the metal panels according to the manufacturer’s instructions and fasten them with screws.
* **Polycarbonate Panels:** Install polycarbonate panels according to the manufacturer’s instructions using appropriate fasteners and sealing techniques.
## 6. Finishing Touches and Enhancements: Adding Style and Functionality
Once the basic structure is complete, you can add finishing touches and enhancements to customize your patio cover. This includes adding trim, lighting, and other features.
### 6.1. Adding Trim
* **Cutting Trim:** Cut the trim to the appropriate length and angle.
* **Attaching Trim:** Attach the trim to the posts, beams, and rafters using nails or screws.
### 6.2. Installing Lighting
* **Wiring:** Run electrical wiring for lighting fixtures. Consult with a qualified electrician if you are not comfortable working with electricity.
* **Fixtures:** Install lighting fixtures to provide illumination and ambiance.
### 6.3. Adding Other Features
* **Fans:** Install ceiling fans to provide cooling and air circulation.
* **Screens:** Add screens to protect against insects.
* **Curtains:** Install curtains for privacy and shade.
## 7. Maintenance and Care: Ensuring Longevity
Regular maintenance and care will help extend the life of your patio cover and keep it looking its best.
### 7.1. Cleaning
* **Regular Cleaning:** Clean the patio cover regularly to remove dirt, debris, and mildew. Use a mild detergent and water.
### 7.2. Inspections
* **Periodic Inspections:** Inspect the patio cover periodically for signs of damage or wear. Check for loose fasteners, cracked lumber, or damaged roofing materials.
### 7.3. Repairs
* **Prompt Repairs:** Repair any damage promptly to prevent further deterioration. Replace damaged lumber, tighten loose fasteners, and repair or replace damaged roofing materials.
## Understanding Patio Cover Types and Choosing the Right One
Different patio cover types offer varying levels of protection and aesthetic appeal. Here’s a brief overview:
* **Solid Roof Patio Covers:** Provide complete protection from the elements, ideal for creating an outdoor living room.
* **Lattice Patio Covers:** Offer partial shade while allowing some sunlight to filter through, creating a dappled effect.
* **Pergolas:** Feature an open-beam design that provides minimal shade but adds architectural interest.
* **Retractable Awnings:** Offer adjustable shade, allowing you to control the amount of sunlight that reaches your patio.
The choice depends on your climate, budget, and aesthetic preferences. For example, in areas with heavy rainfall, a solid roof patio cover is the most practical choice. In sunny climates, a lattice patio cover can provide a comfortable balance of shade and sunlight.
## The Benefits of a Well-Built Patio Cover
* **Increased Home Value:** A well-designed and constructed patio cover can increase your home’s property value.
* **Extended Outdoor Living Space:** Creates a comfortable and functional outdoor living space that can be used year-round.
* **Protection from the Elements:** Provides protection from the sun, rain, and other elements.
* **Enhanced Aesthetic Appeal:** Adds aesthetic appeal to your home and landscape.
Users consistently report increased enjoyment of their outdoor spaces after installing a patio cover. Our analysis reveals that patio covers can significantly improve the quality of life for homeowners.
## Expert Review: The Alumawood Patio Cover System
While this article focuses on *how to build a patio cover step by step* from scratch, let’s consider a popular product: the Alumawood patio cover system. This offers a pre-engineered solution designed for ease of installation and lasting durability. It’s a great option if you want the look of wood without the maintenance.
### What is Alumawood?
Alumawood is an aluminum product coated with a textured wood-grain finish. It replicates the appearance of wood but offers superior resistance to rot, insects, and fire. It’s a popular choice for homeowners seeking a low-maintenance alternative to traditional wood patio covers.
### Key Features of Alumawood Patio Covers
1. **Durable Aluminum Construction:** Alumawood is made from high-strength aluminum that is resistant to rust, corrosion, and fading. This ensures that your patio cover will last for many years with minimal maintenance. The aluminum also provides superior structural integrity compared to some wood alternatives.
2. **Realistic Wood-Grain Finish:** The textured wood-grain finish replicates the look and feel of natural wood, adding aesthetic appeal to your outdoor space. The finish is also resistant to chipping, cracking, and peeling.
3. **Low Maintenance:** Unlike wood, Alumawood requires minimal maintenance. It does not need to be painted, stained, or sealed. Simply wash it with soap and water to keep it looking its best. This saves you time and money in the long run.
4. **Fire Resistance:** Alumawood is non-combustible, making it a safer option than wood. This can provide peace of mind and potentially lower your insurance premiums.
5. **Customizable Design:** Alumawood patio covers can be customized to fit your specific needs and preferences. You can choose from a variety of colors, styles, and sizes.
6. **Easy Installation:** Alumawood patio covers are designed for relatively easy installation, although professional installation is recommended for best results. The pre-engineered components simplify the assembly process.
7. **Warranty Protection:** Alumawood patio covers typically come with a comprehensive warranty that covers defects in materials and workmanship.
### Advantages of Alumawood
* **Long-lasting:** Alumawood is highly durable and resistant to the elements, ensuring a long lifespan.
* **Low-maintenance:** Requires minimal maintenance, saving you time and effort.
* **Aesthetically pleasing:** Replicates the look of wood without the drawbacks.
* **Fire-resistant:** Provides added safety and peace of mind.
* **Customizable:** Can be tailored to your specific needs and preferences.
Users consistently praise the low-maintenance aspect of Alumawood. Our analysis reveals that Alumawood patio covers offer a significant return on investment due to their durability and longevity.
### Disadvantages of Alumawood
* **Higher Initial Cost:** Alumawood patio covers typically have a higher initial cost than wood patio covers.
* **Not as Authentic as Wood:** While the wood-grain finish is realistic, it is not the same as natural wood.
* **Can Dent or Scratch:** While durable, Alumawood can be dented or scratched if subjected to impact.
* **Limited Color Options:** The color options for Alumawood are more limited than for painted wood.
### Who is Alumawood Best Suited For?
Alumawood patio covers are best suited for homeowners who want a low-maintenance, durable, and aesthetically pleasing patio cover that replicates the look of wood. They are particularly well-suited for those who live in areas with harsh climates or who do not want to spend time maintaining a wood patio cover.
### Alternatives to Alumawood
* **Wood Patio Covers:** Offer a classic and natural look but require regular maintenance.
* **Vinyl Patio Covers:** A low-maintenance option that is resistant to rot and insects but may not be as aesthetically pleasing as wood or Alumawood.
### Expert Verdict
Alumawood patio covers are a solid choice for homeowners seeking a durable, low-maintenance, and aesthetically pleasing alternative to wood. While the initial cost is higher, the long-term benefits and minimal maintenance make it a worthwhile investment. We highly recommend Alumawood for homeowners who prioritize durability and convenience.
## Q&A: Common Questions About Building Patio Covers
Here are some frequently asked questions about building patio covers, addressing more nuanced concerns than basic tutorials often cover:
**Q1: How do I ensure proper drainage for my patio cover roof to prevent water damage to my home?**
**A:** Proper drainage is crucial. Incorporate a slight slope into your roof design (minimum 1/4 inch per foot). Install gutters and downspouts to direct water away from your foundation. Consider the existing drainage patterns around your home and ensure the patio cover doesn’t disrupt them.
**Q2: What’s the best way to attach a patio cover to a brick or stucco house without causing damage or leaks?**
**A:** Use appropriate anchors designed for brick or stucco. Pre-drill pilot holes to prevent cracking. Seal the attachment points with a high-quality exterior caulk to prevent water intrusion. Consider using a ledger board attached to the house for added support.
**Q3: How can I minimize the risk of my patio cover being damaged by strong winds or heavy snow?**
**A:** Ensure your patio cover is properly engineered to withstand local wind and snow loads. Use high-quality fasteners and connections. Reinforce the structure with additional bracing if necessary. Regularly inspect the structure for signs of weakness or damage.
**Q4: What are the common mistakes people make when building a patio cover, and how can I avoid them?**
**A:** Common mistakes include failing to obtain necessary permits, using substandard materials, neglecting proper drainage, and underestimating the complexity of the project. Avoid these mistakes by doing thorough research, planning carefully, and seeking professional help when needed.
**Q5: How do I choose the right roofing material for my patio cover to match my home’s aesthetic and provide adequate protection?**
**A:** Consider the style of your home, the climate in your area, and your budget. Asphalt shingles are a cost-effective option that comes in a variety of colors and styles. Metal roofing is durable and long-lasting but can be more expensive. Polycarbonate panels are lightweight and provide good light transmission but may not be as aesthetically pleasing to some.
**Q6: What are the best ways to integrate lighting into my patio cover design for both functionality and ambiance?**
**A:** Plan your lighting layout carefully. Consider using a combination of ambient, task, and accent lighting. Ambient lighting provides overall illumination, task lighting provides focused light for specific activities, and accent lighting highlights architectural features or landscaping. Use weatherproof fixtures and consult with a qualified electrician.
**Q7: How do I ensure that my patio cover is properly ventilated to prevent moisture buildup and mold growth?**
**A:** Provide adequate ventilation by leaving gaps between the roofing materials and the framing members. Consider using vented roofing materials. Ensure that the area under the patio cover is well-ventilated.
**Q8: What are the different types of foundations I can use for my patio cover, and how do I choose the right one?**
**A:** Common foundation options include concrete footings, piers, and slabs. Choose the right foundation based on soil conditions, local building codes, and the size and weight of your patio cover. Concrete footings are typically used for freestanding patio covers, while piers and slabs are often used for attached patio covers.
**Q9: How can I add privacy to my patio cover without completely blocking out the sunlight or airflow?**
**A:** Consider using lattice panels, screens, curtains, or plants to add privacy. Choose materials that allow some light and air to pass through. Consider the direction of the sun and prevailing winds when positioning the privacy elements.
**Q10: What are the long-term maintenance costs associated with owning a patio cover, and how can I minimize them?**
**A:** Long-term maintenance costs can include cleaning, repairs, and replacements. Minimize these costs by using high-quality materials, performing regular maintenance, and addressing any problems promptly. Consider using low-maintenance materials such as aluminum or vinyl.
## Conclusion: Building Your Dream Patio Cover
Building a patio cover is a rewarding project that can transform your outdoor living space. By following these step-by-step instructions and expert tips, you can create a beautiful and functional patio cover that will provide years of enjoyment. Remember to plan carefully, use high-quality materials, and seek professional help when needed. We’ve covered everything from basic construction to advanced considerations, providing you with a resource significantly more comprehensive than many other guides. Now you are armed with the knowledge to build the perfect patio cover for your home. Share your experiences with how to build a patio cover step by step in the comments below!

